This is the Saint Louis Science Center’s DAY SKY UPDATE for the Month of January 2025.
Information updated monthly or as needed.
Times given as local St. Louis time which is Central Standard Time (CST). For definitions of terminology used in the night sky update, click the highlighted text. If relying on times posted in Universal Time (UT), St. Louis is -6 hours when CST.
Join us for our next solar telescope viewing, Sunday, January 19, 2025, held in association with the St. Louis Astronomical Society. For details, see the information at the bottom of this page or visit
Daytime Astronomy Primer
For most, astronomy is a hobby that is left to the darkness of night. While most astronomical objects are only visible at night, the day sky can offer a careful observer several astronomical targets along with a multitude of atmospheric phenomena to enjoy. When posted, the DAY SKY UPDATE will explore these possibilities which may include a highlight of the month, cloud observing, sun rise/set times, daytime Moon information, daytime planets and other topics. As always, when viewing during daytime, you must use caution as the Sun is always near.
Aside from solar filters, there are other safety steps that you should consider. Sunscreen, hats and sunglasses are always advisable. Visible light is how we observe the world around us, however, there is light we cannot see. Ultraviolet (UV) and infrared (IR) light are great examples of this. While both are an issue if you are using an optical system, UV light is an issue through exposure. This can be mitigated by using sunscreen, sunglasses and limiting exposed skin. While sunglasses are not safe instruments to view the Sun with, they do protect your eyes from exposure to ultraviolet light that we are susceptible to during the day. If you would like to learn more about UV and its dangers use the buttons below.
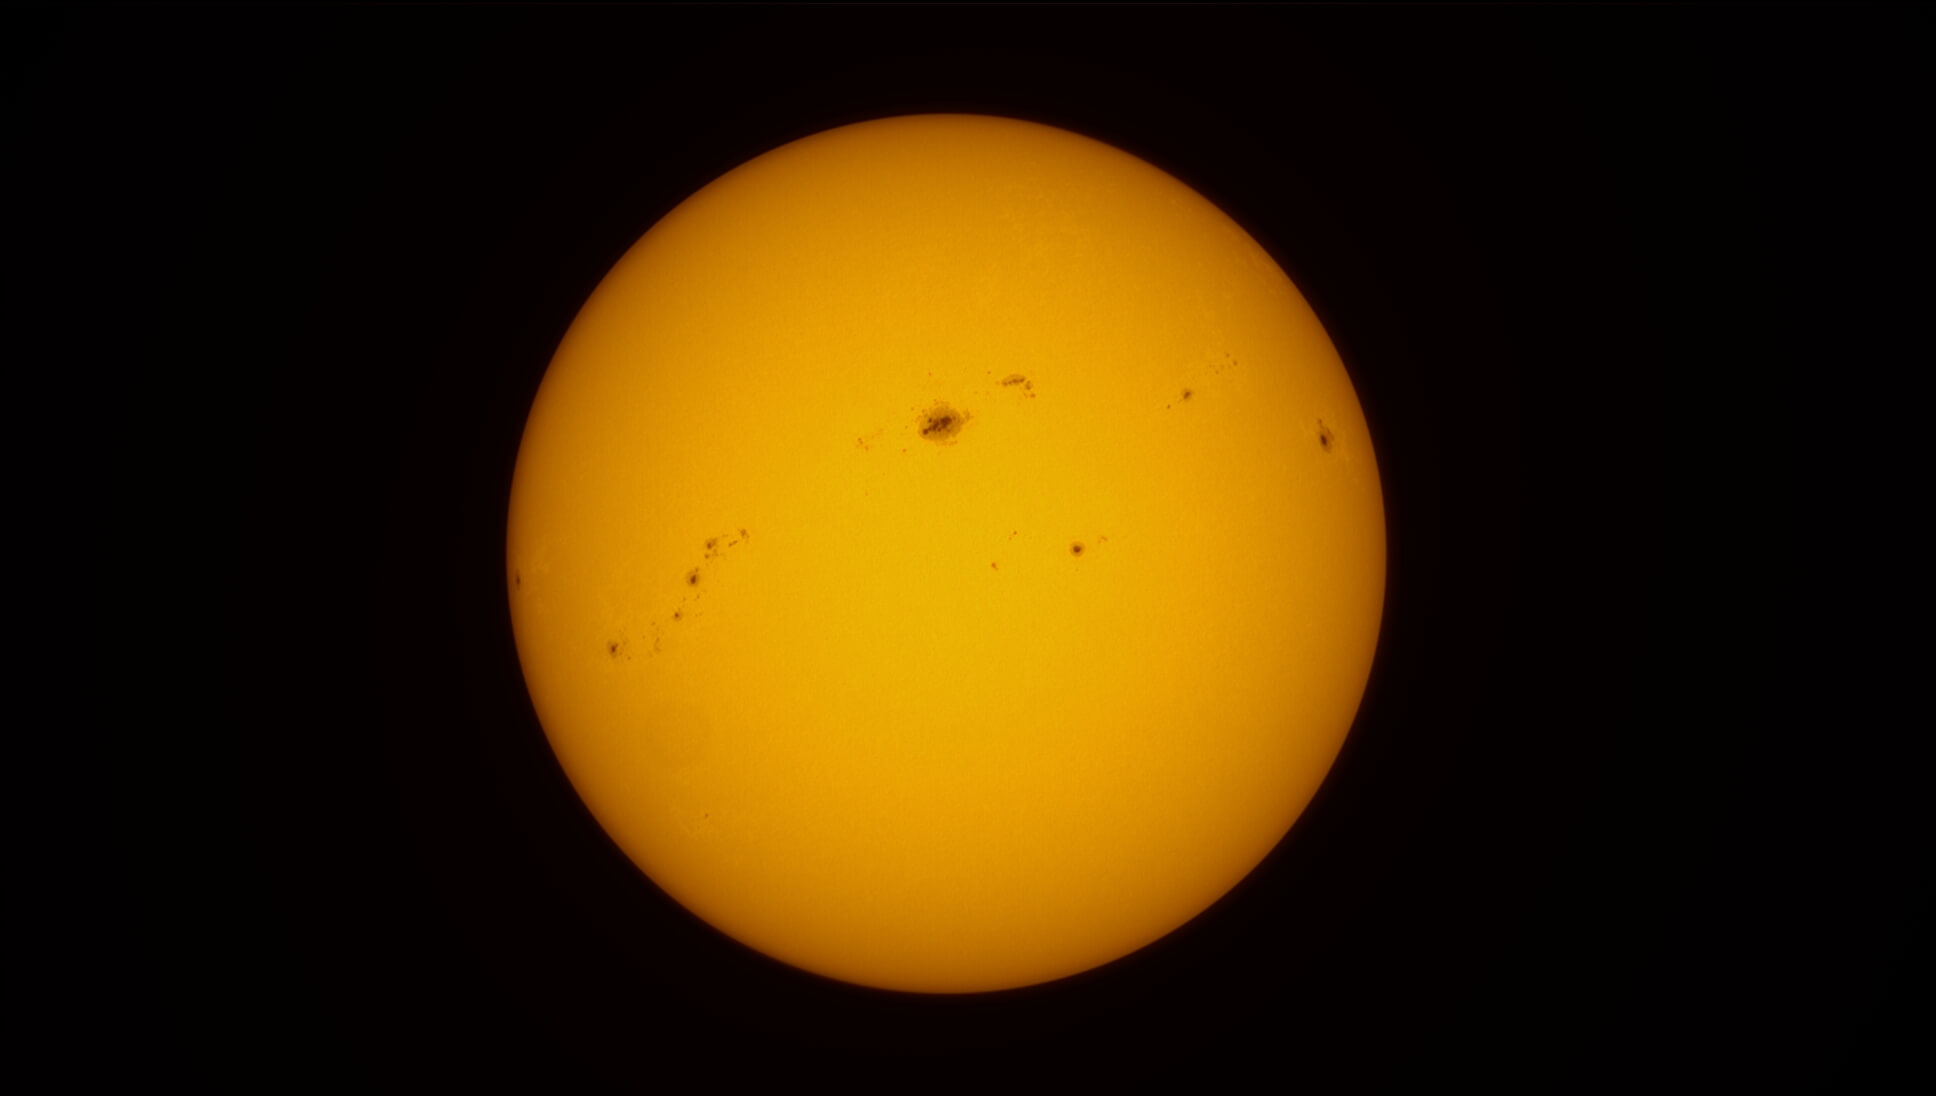
White light image of the Sun taken on August 9, 2024, In the image you can see several complex sunspot regions. Image credit: Randy Harrison from River Bend Astronomy Club and Lookin’ Up Optics.
Daytime Observing Highlight
The day sky highlight for January 2025 is the Sun. As this is the first Day Sky Update, it makes sense to start with the Sun as it is the first object most will notice while outside. What we will focus on for this update is viewing the Sun using safe solar filters. There are several types of filters available, but we will focus on the two most common and accessible filters: white light and hydrogen alpha. In addition to discussing what they are, we will highlight the types of solar features that are visible when using them.
As always when discussing any kind of solar viewing, we must encourage caution. Looking directly at the Sun can cause eye damage that can lead to permanent vision loss. When using instruments such as a telescope, binocular or camera, the Sun will cause permanent eye damage if they are not properly filtered. Only look at the Sun if you know for sure your solar filters are proper safe filters. The best way to ensure this is to purchase the filters from the manufacturer or official dealers for the company that offers the product. While they may be convenient, third-party sellers can unknowingly or knowingly sell improper filters. This was a concern when there was a rush to buy eclipse glasses over the last few years due to the recent solar eclipses in 2017 and 2024. In 2017, I had visitors bring glasses they had purchased from a third-party seller that were fake. So, if you are interested in solar viewing make sure to do the research on the filters you are buying to know what is right and safe for your interests.
Solar filters should always be inspected before being used. Always check for damage to filters or other components of the filtering system. Read the manufacturer’s information that comes with the equipment to learn how to use the equipment or if there are recommendations for how long you can use the item. If cared for, most solar filters and other solar equipment are safe for several years. However, always default to the suggested life span of the equipment by the manufacturer.
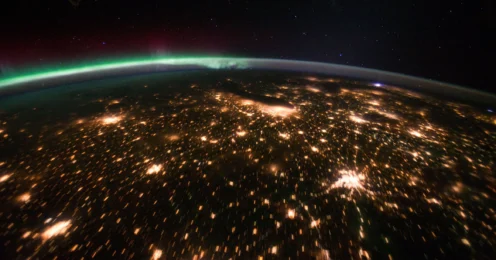
Interest in the Sun has remained high since the eclipse in April 2024. A key reason for this is the Sun reached solar maximum in 2024 and as such, solar activity is high. As a result of this high activity, observers around the world were treated to two vivid aurora displays caused by major geomagnetic storms that produced auroras as far south as Puerto Rico.
White Light Filter
For those learning about solar viewing, the best solar filter to start with is a white light filter. They are called this because they allow a little bit of the entire visible light spectrum to pass through. The material used in these filters rejects all but 0.001% of the light from the Sun, making it safe to view. When I use these on my telescopes, I always inspect them for scratches, tears or holes. The material used in these filters is durable, but always err on the side of caution. When inspecting the filter, turn on a light source and put the filter between you and the light. Look for any spots where light appears to pass through unfiltered. Remember to always err on the side of caution.
When looking through a white light filter, we see the Sun’s photosphere. This part of the Sun is the deepest we can see into our star, which is why the photosphere is often called the Sun’s visible surface. The features visible in the photosphere are sunspots, facula and granules. Sunspots and facula are caused by magnetic fields while granules are convective cells where hot plasma bubbles up and the cooler plasma sinks in the dark boundaries of the granules.
If you do not have a white light filter, the photosphere can be viewed using projection methods. These involve using optical systems such as telescopes or binoculars to project an image of the Sun onto a wall or some sort of screen. If you use this method, you DO NOT look through the instrument. This is an indirect method to observe the Sun, but it does come with some challenges. Additionally, the level of detail visible in projected images will not match the details seen through a properly filtered telescope.
White light filters are full aperture filters. They are placed on the front of the telescope covering the instruments full aperture. These are best to start with as they can be used on most telescopes and can then be removed for nighttime viewing. They are significantly cheaper than any other solar filter with their cost being determined by the size of the telescope.
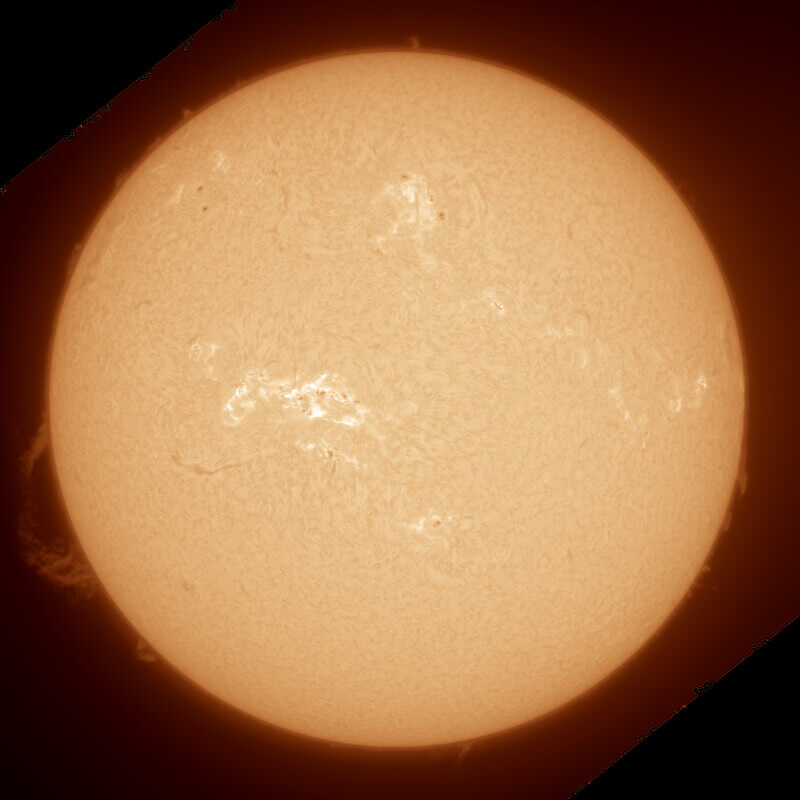
The image above is an H-alpha view of the Sun from April 18, 2024. The bright material near the center is plage associated with a sunspot group. The thin dark lines seen on the solar disk are filaments while the large plasma arch on the left is a prominence. Image credit: Kevin M. Gill.
Hydrogen Alpha Filter
The other filter we will address is a hydrogen alpha filter or what is commonly called an H-alpha filter. These solar filters are an example of a narrow band filter. Instead of the entire visible light spectrum, they reject all but a targeted wavelength. In the case of H-alpha filters they allow you to see light at roughly 656 nm. This light is produced by hydrogen atoms when its electron falls from its third to second energy level. As the electron falls to a lower energy level it emits a photo at a frequency that matches the amount of energy the electron lost. At 656 nm, the light we see is a red wavelength.
This behavior is seen in other objects such as emission nebula or displays such as the aurora. The color of light we see is determined by the amount of energy lost and what element is being affected.
H-alpha telescopes use several types of filters to make viewing the Sun safe. Many of them function by reflecting and absorbing wavelengths that are not desired while the etalon filter targets a specific bandpass of light through interference. The three main filters in these systems are an energy rejection filter (ERF), and etalon and a blocking filter. If you are interested in the finer details of how this works, one of the larger manufacturers of H-alpha telescopes, Lunt Solar Systems, has an excellent write-up posted on their website which can be found here.
When we observe the Sun with an H-alpha telescope, we are looking at the inner atmosphere of the Sun which is called the chromosphere. This region of the Sun is above the Sun’s photosphere. In this region, we can see several different features. Like in the photosphere, sunspots and granules are visible when viewing the chromosphere. Near the sunspot groups we can also see features called plage. Similar to faculae, plage are features cause by magnetic fields associated with granules. They are ultimately the same thing, plage are just viewed in the chromosphere. Both features appear as large bright areas typically found near sunspot regions.
Additionally, structures called prominence, and filaments are visible in the chromosphere. While they are the same kind of structure, filaments and prominence look different due to where we see them. Prominence appears as large bright structures that extend off the edge of the Sun, while filaments appear as dark arcs visible on the face of the Sun. Both are loops of plasma that are interacting with magnetic fields rooted in the photosphere of the Sun.
Another great way to explore solar features with an H-alpha telescope is to work through the Astronomical League’s Hydrogen Alpha Solar Observing Program.
The final solar phenomenon we will mention is solar flares. Solar flares are releases of accumulated energy associated with the magnetic structures that produce sunspots, filaments or prominence. A solar flare occurs as magnetic fields on the Sun realign or reconnect. When viewing the Sun through an H-alpha telescope, a solar flare appears as a sudden brightening in the area of various features such as sunspot, plage or filaments. The brightening will not last long, often fading in just a few minutes, while more intense flares can persist for longer periods.
If you think you have spotted a solar flare, you can confirm the event by checking NOAA’s Space Weather Predictions Center. Here you will find posted x-ray flux data recorded by the GOES-16 and GOES-18 weather satellites. The data is reported every minute, so it serves as a near real time monitoring of solar flare activity. If you think you have seen a solar flare, check the x-ray flux graph for a corresponding peak in the data.
Viewing the Sun can be a fun and rewarding aspect to star gazing. It comes with some associated dangers, but when done properly, using safe solar equipment, you can enjoy one of the most dynamic objects visible in the sky. Thanks to the eclipse that occurred on April 8, 2024, there are still numerous resources available to learn about the Sun and how to safely view it using various methods. I encourage all to learn about the Sun as it is critical for understanding many aspects of our lives on Earth. A good place to start is the American Astronomical Society’s website for the Eclipse that occurred on April 8, 2024. This website has numerous articles and resources that can help us learn more about the Sun. American Astronomical Society Resources
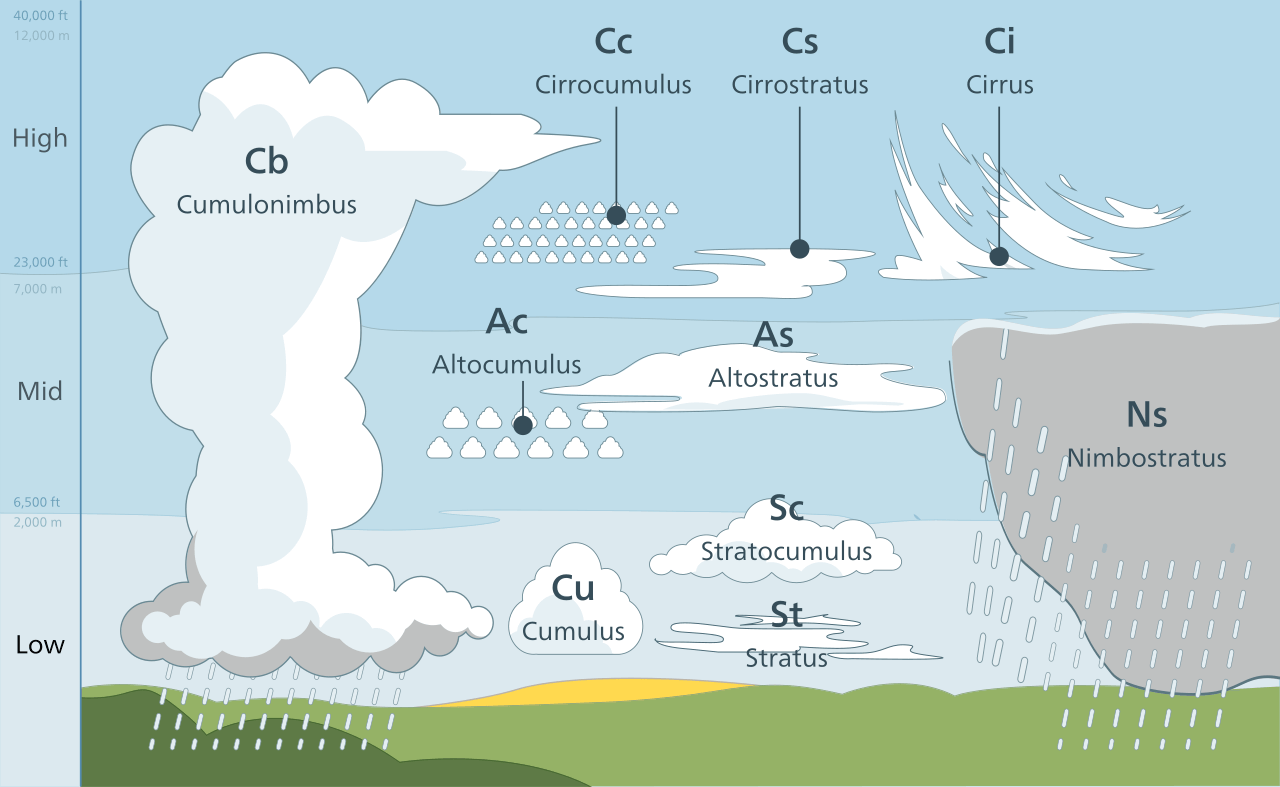
Image credit: Valentin de Bruyn/Cotton.
Cloud of the Month
Clouds are the enemy to astronomers when trying to observe the nighttime sky, but they are a beauty of their own. As we live our lives and the clouds move on above us, we might not even give them a second thought. However, identifying clouds is very important to understanding our weather and climate and can be useful for local forecasting. When looking at a cloud, you are seeing tiny water droplets and ice crystals that are clumped together and suspended in the air. Clouds form in the lowest layer of the Earth’s atmosphere (the troposphere) when warm air rises, cools, condenses.
There are many different types of clouds which are separated into low, middle, and high-level clouds, determined by the cloud’s base above Earth’s surface. In 1803, an English naturalist named Luke Howard developed a cloud classification system in which he embedded Latin terms in the cloud names to describe their appearance. The first one being cumulus meaning “heap or puffy,” the second one stratus meaning “layered,” the third one cirrus meaning “wispy,” and lastly nimbus standing for “rain bearing.” One can use these names and even combine them to characterize the clouds we see.
Low-level clouds include stratus, stratocumulus, nimbostratus, and cumulus. Stratus clouds are grey in color and in some cases cover the entire sky, but they do not form precipitation. Stratocumulus are low, puffy clouds that appear in sheets or patches. Typically, if you hold up your arm at arm’s length, each stratocumulus cluster will be about the size of your fist. Nimbostratus are very dark gray clouds that can produce light to moderate rain or snow and will completely obscure objects like the Sun or the Moon. Cumulus are white, puffy cotton ball like clouds with a flat base, and they tend to be far apart from one another with lots of blue sky between them.
Mid-level clouds include altocumulus and altostratus. Altocumulus are light gray in color and appear in puffy masses, that are sometimes seen in parallel waves. If you hold your hand out at arm’s length, each altocumulus puff will be about the size of your thumbnail. Altostratus are grey clouds that cover the entire sky but do not obscure objects like the Sun and Moon.
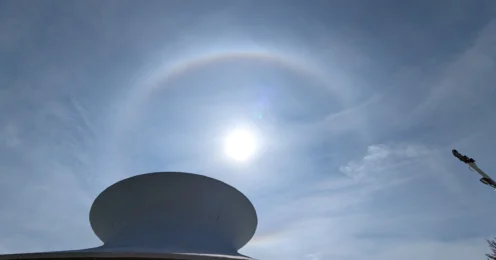
High-level clouds include cirrus, cirrocumulus, and cirrostratus. Cirrus is the most common high-level clouds which are made of ice crystals. They appear white and have a distinct wispy look. These clouds move easily with the wind and can be seen moving from west to east. Cirrocumulus are small, white, puffy clouds that can be by themselves or appear in rows which can give them a rippling affect. Cirrostratus are thin, white clouds that can span a substantial portion of the sky. These clouds are so thin that objects like the Sun and Moon can be seen peeking through. The ice crystals that compose these clouds will bend the light passing through causing a variety of ice halos that appear near the Sun or Moon. Sometimes cirrostratus are so thin that the halo is the only indication that these clouds are even present!
Clouds are very interesting objects to observe, and without them we wouldn’t be able to enjoy the wonders of rain or snow. Cloud identification and observing is a great way to get into the science of meteorology and understanding weather forecasts! In future Day Sky Updates, we will explore different cloud types in greater detail and provide observing tips that can offer new insights and understandings to the phenomena of the daytime sky.
The Sun and the Moon
Sun Information
During January 2025, the Sun will continue its journey back towards its northern standstill later this year in June. If you track the position of sunrise or sunset this month you will find these positions are shifting to the north. Maximum altitude will also change each day as the Sun reaches higher altitudes each day closer to the June solstice. For January 2025, the Sun’s maximum altitude will shift from 28.4° on January 1st, to 34.2° on January 31st. The next major position of the Sun occurs on March 20, 2025, as the Sun reaches the March equinox. On this date, Spring begins in the northern hemisphere and fall begins in the southern hemisphere.
On January 4, 2025, Earth reaches perihelion. This is when Earth is closest to the Sun. On this date, the Earth will be approximately 91.4 million miles from the Sun. Aphelion or when we are at our greatest distance from the Sun, occurs in July each year. Aphelion for 2025 occurs on July 3, 2025. On this date, Earth will be roughly 94.5 million miles from the Sun. These two extremes are called apsides which are the near and far points in an orbit. The shape of Earth’s orbit will change over a period of approximately 100,000 years due to gravitational influences from Jupiter and Saturn. This is referred to Earth’s eccentricity. As our eccentricity changes, our max and min distance from the Sun also changes. The long-term variation of the shape of Earth’s orbit is one of the factors that influences periods of glaciation. If you would like to learn more about this, you will want to explore Milankovitch Cycles.
Sunrise and Sunset Times for St. Louis Missouri
The sunrise and sunset times below were calculated by the Earth Systems Research Laboratories for NOAA. These times are calculated using equations for Jean Meeus’s Astronomical Algorithms. The atmosphere complicates these calculations due to the refraction of sunlight as it passes through the atmosphere. For the times listed below, the amount of atmospheric refraction is assumed to be 0.833°. Variations in the atmosphere can change the amount of refraction so the times posted are accurate to within a minute for latitudes between +/- 72°. You can learn more about these calculations and where to generate times for areas outside of St. Louis, Missouri by using the buttons below
Moon (daytime views)
The Moon is one of the best daytime targets we can observe. Throughout most of the synodic month, the Moon can be viewed during the day. There are, however, ideal phases during which the Moon is much easier to find and see. There are only two phases of the Moon during which it is not visible in daytime; these are new moon and full moon. During new moon, the Moon is between Earth and the Sun. The side facing us is not reflecting sunlight and will not be visible. The only time we can see the Moon during new moon is when we see its silhouette during a solar eclipse.
During full moon, daytime views are not possible because the Moon is appearing near the anti-solar point in the sky. Because of this position, the Moon rises only once the Sun is setting. The closer the moon is to one of the two phases, the more difficult it will be to find in daytime.
Another factor that makes viewing the Moon during daytime difficult is the contrast between the day sky and the lunar surface. If the Moon is exhibiting a thin waxing or waning crescent phase, it can be difficult to see the Moon with a bright daytime sky. A few years ago, I was attempting to view a lunar occultation of the planet Mercury during daylight hours, That day the Moon was exhibiting a thin waning crescent phase with just 2% disk illumination. Using a telescope, I was able to spot Mercury just before it disappeared behind the Moon, however, I was not able to see the Moon.
With the above issues in mind, the ideal time to look for the Moon during the day is when the Moon is near a quarter phase. During a quarter phase, the contrast between the Moon and the sky will be good. It will also provide you with the most amount of time for those daylight views. If the Moon is near first quarter, you should look for the Moon in the afternoon. If it is near last quarter, look for it in the morning. The table below will list the main phases of the Moon for the current lunation. Binoculars or telescopes will improve what you can see on the Moon during daylight hours.
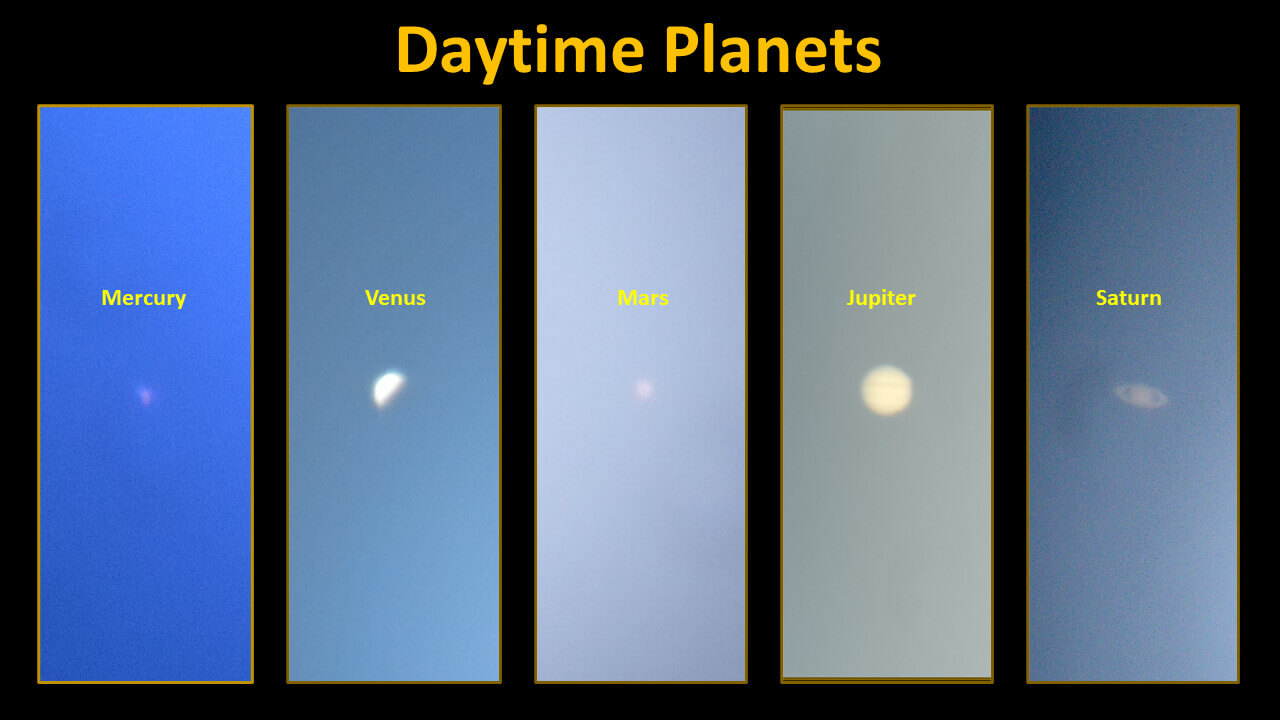
Daytime Planets
Tracking down the planets in the daytime is another great option for daytime astronomy. With the use of a telescope, all five naked planets can be seen in daylight hours. Several factors will impact your success in finding these planets. These include time of day, their elongation from the Sun and viewing conditions. When it is near sunrise or sunset, the contrast between the sky and the planet might be better. Viewing conditions such as seeing or transparency will impact how well you see the planet. And lastly, a planet’s elongation from the Sun is an angular measurement of how far from the Sun we can see the planet. If the planet and Sun appear to close together, the bright glare of the Sun can overwhelm the dimmer planet. Additionally, the closer the planet appears to the Sun, the more dangerous the attempt to view the planet becomes. As a rule of thumb, many suggest 8° of elongation to be the cutoff. Any closer you risk accidentally looking at the Sun.
I do not recommend attempting to view planets in daytime for someone that is new to telescopes. Due to the inherent dangers in using a telescope during the day, this is an option I suggest reserving for when someone is a little more experienced in the use of a telescope. Desktop planetarium software can also help you find the position of a planet and what their solar elongation is. I recommend using the free software called Stellarium. Before using telescopes to find daytime planets I recommend using binoculars. Once you figure out the planet’s solar elongation, you can position yourself near a building that blocks the Sun from view. This way there is no chance you will accidentally look at the Sun.
Venus is the best daytime planet to start with. Binoculars or a telescope are currently needed to spot the planet in daytime. On January 1, 2025, Venus will have a solar elongation of 47.0°. By January 31, 2025, Solar elongation for Venus is 45.1°. The reason it is decreasing is because Venus reaches maximum eastern elongation on January 9, 2025. After this date, Venus starts to head back towards the Sun as it approaches inferior conjunction on March 22, 2025. This is when Venus will pass between Earth and the Sun.
Our next Solar Sunday will be held on Sunday, January 19, 2025, from 11:00 a.m. until 3:00 p.m. (Weather Dependent)
On the third Sunday of each month, the St. Louis Astronomical Society and the Saint Louis Science Center will set up a number of safe solar telescopes outdoors and be on-hand to answer your questions. Telescope viewing begins at 11:00 a.m.
The St. Louis Astronomical Society helps host the monthly Star Parties at the Saint Louis Science Center. In addition to our daytime viewings, they also help facilitate our nighttime Public Telescope Viewing. These nighttime viewing sessions occur on the 1st Friday each month. Visit SLAS’s website linked above to learn about other telescope events SLAS hosts around the St. Louis area.
The Day Sky Update is compiled by McDonnell Planetarium staff.